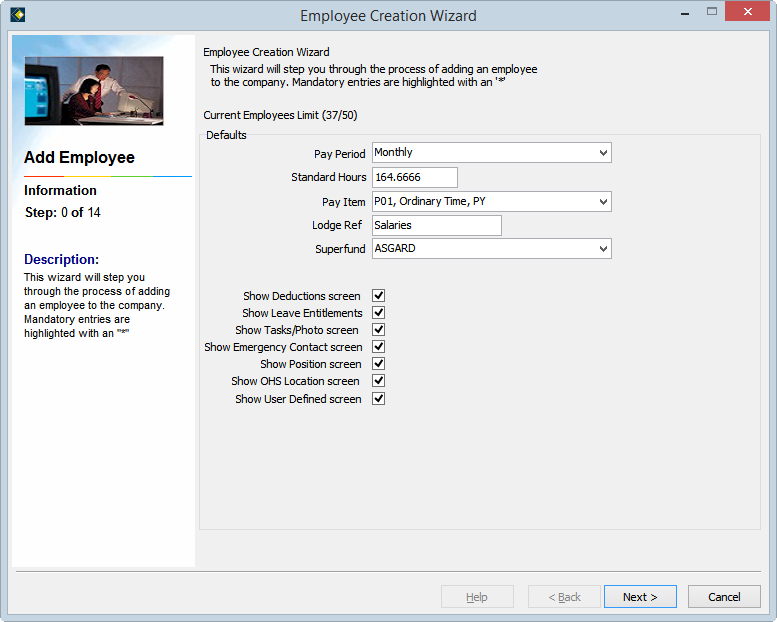
Step 0: Information (Default Settings)
The first step of the Employee Creation Wizard is optional. It allows you to set certain defaults for settings which appear through the wizard. Any settings can be overridden as you proceed through the wizard, and will be saved for the next time you use the Employee Creation Wizard.
This screen also displays a total of your current employees, so you can be sure there are sufficient free licenses before you proceed. (If you do not have sufficient licenses, please contact the HR3 office to arrange an upgrade).

Complete the following information as required:
| Field | Explanation |
|---|---|
| Pay Periods | Select the default frequency of this employee's standard pay period. This value will be automatically inserted at step 6. |
| Standard Hours | Enter the standard number of ordinary hours this employee will work in the selected pay period. This value will be automatically inserted at step 6 |
| Pay Item | If you want the wizard to automatically insert a default pay item at step 6, select it here. For example P01, Ordinary Time, PY. |
| Lodge Ref | This is the default lodgement reference which will identify each employee's salary on their bank statement, and is used at step 7 |
| Superfund | Specify a default super fund here. At step 9, this will be the default fund for selection. |
| Show Deductions Screen | If you want to set up deductions for your employee(s), tick this box to display step 8. You can skip step 8 by leaving this option un-ticked. |
| Show Leave Entitlements | If you want to input opening leave balances, tick this box to display step 10. You can also check each employee's leave accrual settings and entitlement dates. |
| Show Tasks/Photo screen | If you want to set reminders for outstanding tasks, or load a photo, tick this box to display step 11. |
| Show Emergency Contact screen | Ticking this box will display the Emergency Contacts screen, step 4, for the employee. |
| Show Position screen | If you want to assign the new employee to a Position, tick this box to display this option on step 12. |
| Show OHS Location screen | Ticking this box will display the OHS Locations screen, step 13, where you may specify an OHS Location for the employee (if you have these set up within OHS). |
| Show User Defined Screen | Ticking this box will display the User Defined Fields screen at the end of the Employee Wizard process (step 14). This allows you to complete any UDFs for the new employee, without having to do this in the Employee Details screen later. |
Go to Step 1.
